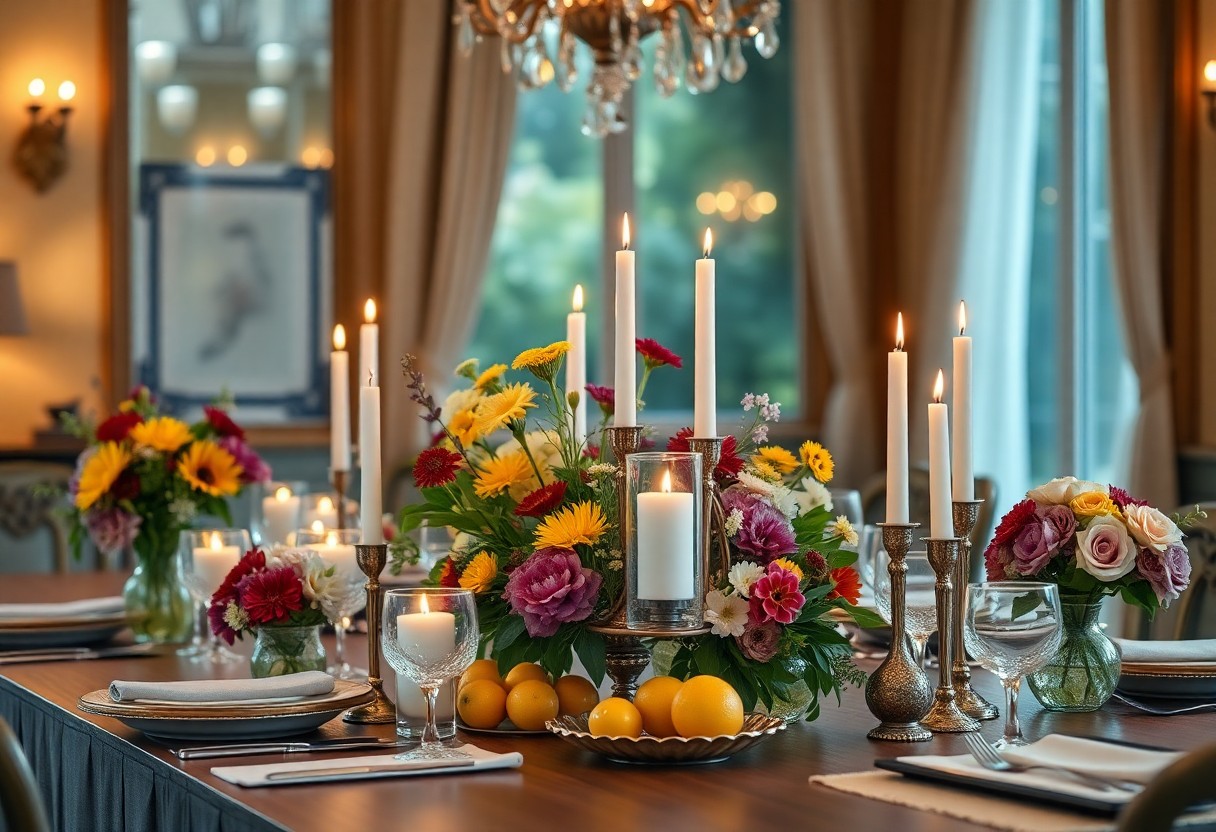
As you begin on the art of crafting exquisite centerpieces, your imagination knows no bounds. With a dash of creativity and a pinch of flair, you can transform any setting into a masterpiece. You will discover the secrets to designing one-of-a-kind arrangements that exude elegance and sophistication, leaving your guests in awe of your exceptional taste. Your unique centerpieces will be the crowning jewel of any gathering, a true reflection of your refined style and artistic expression.
Key Takeaways:
To create unique centerpieces, consider the following points:
- Start with a theme or concept to guide your design decisions and ensure a cohesive look, whether it’s a wedding, holiday, or other special occasion.
- Combine unconventional materials, such as natural elements, vintage items, or repurposed objects, to add visual interest and create a one-of-a-kind centerpiece.
- Play with scale and proportion by mixing large and small elements, and balance bold colors with neutral tones to create a dramatic and eye-catching centerpiece that draws attention.
Defining Your Style
Your personal taste and aesthetic play a significant role in creating unique centerpieces that reflect your individuality, so take a moment to consider what inspires you, from the elegance of a bygone era to the simplicity of modern design.
Considering the Occasion
By taking into account the nature of the gathering, you can tailor your centerpiece to perfectly complement the atmosphere, whether it’s a lavish wedding or an intimate dinner party, and make a lasting impression on your guests.
Exploring Your Personality
Around every corner, your personality shines through in the details, and your centerpiece is no exception, allowing you to express your creativity and flair, and make a statement that is quintimperatively you.
Occasion aside, your personality is the true star of the show, and as you explore the vast array of possibilities, you’ll discover that your centerpiece is a reflection of your inner world, a symphony of colors, textures, and shapes that resonate with your very being, and invite your guests to experience the essence of your hospitality.
Gathering Inspiration
If you’re looking to create unique centerpieces, you’ll want to start by gathering inspiration from various sources. This can be a fascinating process, as you explore different ideas and themes to find the perfect fit for your occasion. Your creativity will be sparked by the world around you, and you’ll begin to envision the perfect centerpiece.
Nature’s Influence
Beneath the beauty of the natural world, you’ll discover a wealth of inspiration for your centerpieces. Between the intricate patterns on a leaf and the vibrant colors of a sunset, you’ll find endless ideas to incorporate into your design. Your centerpieces can be a reflection of the beauty that surrounds you, bringing a touch of elegance to your table.
Cultural and Artistic References
Across the globe, you’ll find a diverse array of cultural and artistic influences that can inspire your centerpieces. Amidst the masterpieces of art history and the treasures of cultural heritage, you’ll uncover a rich tapestry of ideas to draw upon. Your centerpieces can be a celebration of the artistic and cultural expressions that inspire you, adding a sophisticated touch to your occasion.
In addition to exploring cultural and artistic references, you can examine deeper into the world of art history, discovering the intricate details and symbolism that can elevate your centerpieces. You can draw inspiration from the opulence of Baroque interiors, the elegance of Art Deco, or the simplicity of minimalist design, allowing your creativity to flourish as you craft unique and captivating centerpieces that reflect your personal style and aesthetic.
Selecting Materials
Choosing Colors and Textures
To add depth and visual interest to your centerpiece, you will want to thoughtfully choose colors and textures that harmonize with one another, creating a symphony of sensations that delight the eye and inspire the imagination, as you strive to craft a true work of art.
Working with Flowers and Greenery
The art of working with flowers and greenery is a delicate one, requiring a gentle touch and an discerning eye, as you select the perfect blooms and foliage to bring your vision to life, and you will be amazed at the transformation that occurs when you combine these elements in a way that is both unexpected and sublime.
With flowers and greenery, you have the opportunity to add a touch of elegance and sophistication to your centerpiece, and as you experiment with different combinations, you will discover the perfect balance of colors, textures, and forms to create a truly breathtaking arrangement that showcases your unique style and flair, and you will be delighted by the way your creation enhances the ambiance of the room, making it a true masterpiece of decor.
Adding Decorative Elements
Despite the simplicity of your centerpiece, it can be elevated to an exquisite creation with the right decorative elements. You can choose from a variety of items to add a touch of elegance and sophistication to your design. Your selection will depend on the theme and style of your event, as well as your personal taste and preference.
Candles and Lighting
Above all, candles and lighting can add a warm and inviting ambiance to your centerpiece. You can use candelabras, lanterns, or string lights to create a soft glow that will enhance the overall aesthetic of your design. Your choice of lighting will set the tone for the entire atmosphere of the room.
Unique Objects and Accessories
About the most interesting aspect of creating a unique centerpiece is the ability to incorporate unusual objects and accessories. You can use vintage items, flowers, or other decorative elements to add a touch of personality to your design. Your creativity and imagination are the only limits to what you can create.
With your unique objects and accessories in place, you can now think about how to arrange them in a way that is visually appealing. You can experiment with different heights, textures, and colors to create a balanced and harmonious composition that will draw the eye to your centerpiece. Your goal is to create a stunning focal point that will be the talk of the evening, and with a little creativity, you can achieve just that.
Balancing and Harmonizing
Keep in mind that a well-designed centerpiece is all about balance and harmony, creating a visual equilibrium that delights the eye and elevates the ambiance of the entire space, as you strive to create a unique and captivating atmosphere.
Symmetry and Asymmetry
Betwixt the two extremes of perfectly symmetrical and utterly asymmetrical designs, you will find a plethora of creative possibilities, as you experiment with different arrangements to find the perfect blend that suits your taste and style.
Creating Visual Interest
Beside the basic principles of design, your centerpiece should also incorporate elements that spark curiosity and intrigue, drawing the viewer’s eye and inviting them to linger, as you carefully select each component to create a rich and engaging visual experience.
Considering the multitude of options available, you may choose to combine different textures, colors, and shapes to add depth and visual interest to your centerpiece, thereby creating a truly unique and captivating focal point that reflects your personal style and flair, as you skillfully balance aesthetics and creativity to produce a masterpiece that is at once elegant and sophisticated.
Final Touches
Many details can make or break the ambiance of your centerpiece, so take your time to perfect it. You have carefully selected each element, and now it’s time to bring them all together in harmony. Your creativity and attention to detail will make your centerpiece truly unique.
Adding a Personal Message
Messaging is key to making your centerpiece meaningful, so consider adding a personal touch, such as a monogram or a special quote, to make it truly yours. You can inscribe it on a decorative stone, a mirror, or even a flower petal, and it will add an intimate feel to your arrangement.
Making it Seasonal
Against the backdrop of the current season, your centerpiece can take on a whole new level of significance. You can incorporate seasonal flowers, branches, or fruits to create a sense of continuity with nature. Your arrangement will be a beautiful reflection of the time of year, and a great conversation starter.
Also, as you make your centerpiece seasonal, you can experiment with different textures, colors, and scents to evoke the essence of the season. You can use pinecones, holly, or evergreen branches for a winter wonderland feel, or sunflowers, daisies, and lemon slices for a bright and cheerful summer arrangement, the possibilities are endless, and it’s up to you to unleash your creativity.
Final Words
Considering all points, you now possess the art of creating unique centerpieces that elevate your space with elegance and sophistication. With your imagination and creativity, you will craft masterpieces that reflect your refined taste, making every gathering a testament to your exceptional style, and as you adorn your table, you will undoubtedly leave a lasting impression on your guests, for in the world of decor, your personal touch is the greatest luxury of all, and it is yours to indulge in.」
FAQ
Q: What are some unique ideas for creating centerpieces for a special event or wedding?
A: There are many unique ideas for creating centerpieces, including using vintage items, such as old lanterns, bottles, or candelabras, and filling them with flowers, greens, or other decorative elements. You can also use natural elements, such as branches, rocks, or driftwood, to create a beautiful and rustic centerpiece. Additionally, you can incorporate personal items, such as photos, seashells, or other mementos, to make the centerpieces more meaningful and personalized.
Q: How can I choose the right flowers and greenery for my centerpieces?
A: Choosing the right flowers and greenery for your centerpieces depends on the theme, color scheme, and style of your event. Consider the season and what flowers are in bloom to ensure freshness and availability. You can also mix and match different textures, colors, and shapes to create a unique and visually appealing arrangement. Don’t be afraid to experiment and combine different elements, such as roses, peonies, and eucalyptus, to create a stunning centerpiece.
Q: What are some creative ways to use lighting in my centerpieces?
A: Lighting can add an extra layer of ambiance and drama to your centerpieces. Consider using candles, fairy lights, or string lights to create a warm and inviting glow. You can also use LED lights or uplighting to highlight specific elements, such as flowers or decorative objects. Another idea is to use lanterns or glass votives with candles or LED lights inside to create a beautiful and soft luminescence.
Q: How can I add a personal touch to my centerpieces?
A: Adding a personal touch to your centerpieces can make them more meaningful and special. Consider incorporating personal items, such as photos, heirlooms, or other mementos, into the arrangement. You can also use customized elements, such as monograms, special dates, or meaningful quotes, to make the centerpieces more unique and personalized. Additionally, you can use elements that reflect your personal style, such as vintage items, antique furniture, or other decorative objects that reflect your interests and hobbies.
Q: What are some tips for creating centerpieces on a budget?
A: Creating centerpieces on a budget requires some creativity and resourcefulness. Consider using items you already have at home, such as vases, bottles, or other containers, and filling them with fresh flowers, greens, or other decorative elements. You can also shop at local markets, thrift stores, or second-hand shops to find unique and affordable items. Another idea is to keep the centerpieces simple and understated, using a few statement pieces rather than a lot of expensive elements. By being creative and flexible, you can create beautiful and unique centerpieces without breaking the bank.