You can create a unique and cozy patchwork quilt with your own hands, and it’s easier than you think. As you explore your creativity, you’ll find that making a patchwork quilt is a fun and rewarding project. You’ll have the opportunity to choose your favorite fabrics and patterns, and with some basic sewing skills, you can bring your vision to life. Your patchwork quilt will be a one-of-a-kind treasure that reflects your personal style and adds warmth to your home.
Key Takeaways:
To get started with DIY Patchwork Quilt projects, consider the following points:
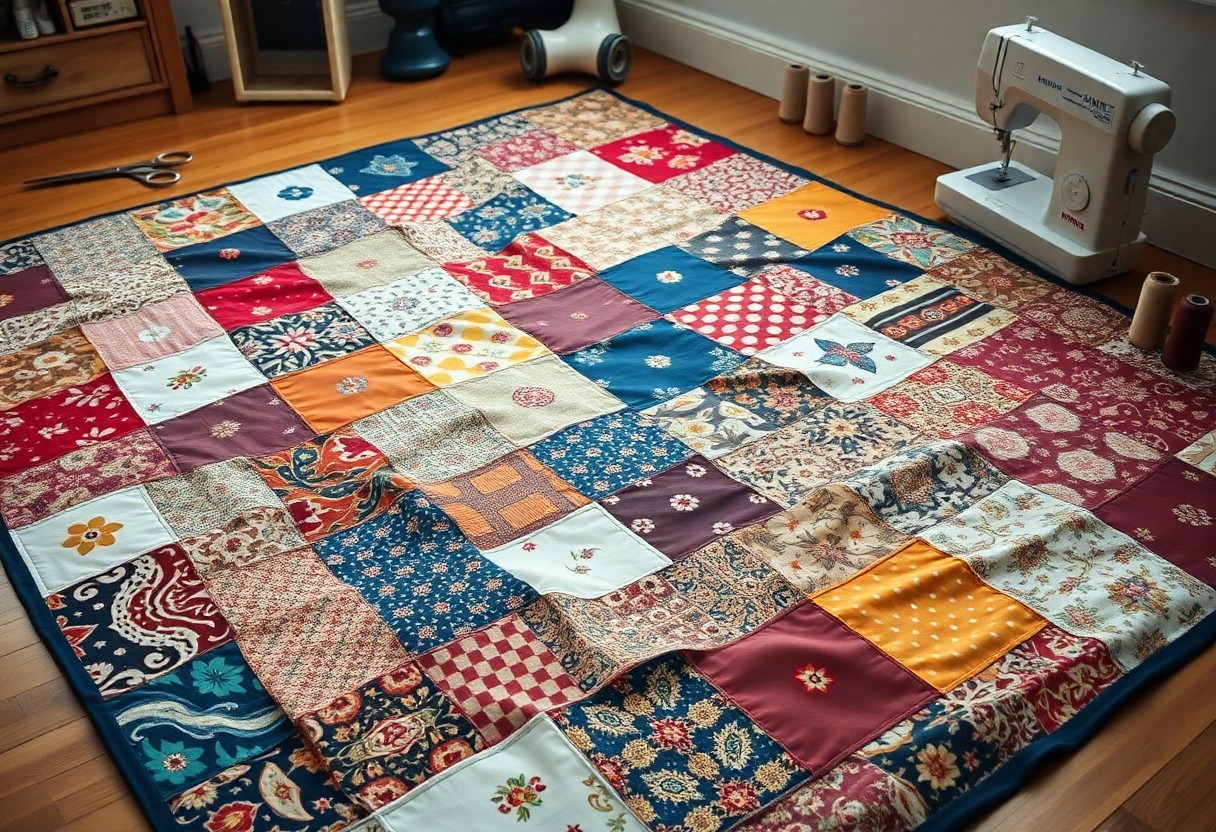
- Choose a color scheme that complements the room where the quilt will be used, and select fabrics that fit within the chosen palette to create a cohesive look.
- Experiment with different patterns and techniques, such as strip piecing or appliqué, to add visual interest and texture to the quilt.
- Consider using repurposed materials, like old clothes or scrap fabric, to create a unique and ecofriendly patchwork quilt that tells a story and reduces waste.
Choosing Fabrics
Your fabric selection will set the tone for your entire patchwork quilt, so take your time and have fun with the process. You’ll want to consider a variety of factors, including color, pattern, and texture.
Selecting Colors and Patterns
Fabrics with complementary colors and patterns will add visual interest to your quilt. You can choose a few statement fabrics and then select others that complement them, creating a cohesive look that reflects your personal style.
Mixing Textures and Thicknesses
Against a backdrop of smooth cotton, you can add texture with velvet, linen, or wool fabrics. You’ll create a unique and engaging quilt that invites touch and exploration.
Patterns will also play a significant role in mixing textures and thicknesses. You can combine large-scale prints with smaller ones, and smooth fabrics with woven or embroidered ones, to add depth and visual interest to your quilt. As you experiment with different textures and thicknesses, you’ll find that your quilt takes on a life of its own, and you’ll be eager to see the finished product.
Tools and Materials
Some basic supplies are necessary to get started with your DIY patchwork quilt project, including fabric, threads, and sewing tools, which you will use to bring your design to life as you work on your quilt.
Essential Sewing Tools
The tools you need for sewing include a sewing machine, rotary cutter, and sewing needles, which you will use to piece together your quilt blocks and sew your quilt layers.
Additional Supplies for Embellishments
One of the ways you can add unique touches to your quilt is by using embellishments, such as buttons, ribbons, or appliques, to give your quilt a personalized look that reflects your style.
Indeed, as you explore the world of embellishments, you will find that the possibilities are endless, and you can use your creativity to add beautiful details to your quilt, such as embroidery floss, fabric paint, or even quilt batting with unique textures, to make your quilt truly special and treasured for years to come, and with these supplies, you will be able to create a one-of-a-kind quilt that showcases your personality and skill.
Designing Your Quilt
Keep in mind that designing your quilt is a personal process, and you should feel free to experiment with different patterns and styles to create a unique piece that reflects your taste and personality.
Traditional Patterns
Besides the classic log cabin and nine-patch designs, you can also explore other traditional patterns, such as the hexagon or star quilt, to add a touch of nostalgia to your project.
Modern and Abstract Designs
Typically, modern quilts feature bold colors and geometric shapes, and you can use these elements to create a contemporary look that suits your home decor and personal style.
But as you investigate deeper into modern and abstract designs, you’ll find that the possibilities are endless, and you can experiment with unusual fabrics, textures, and colors to create a truly one-of-a-kind quilt that showcases your creativity and skill.
Piecing the Quilt Top
Not every quilt top is created equal, and the piecing process can be as unique as you are. As you initiate on this journey, you’ll discover various techniques to bring your design to life.
Basic Techniques for Beginners
One of the first things you’ll need to master is the basic sewing and piecing techniques, which will serve as the foundation for your quilt top. You’ll learn to sew straight lines, piece blocks, and assemble your quilt top with ease.
Advanced Techniques for Complex Designs
Across the various quilt designs, you’ll encounter different techniques that will help you achieve the desired look. Here are a few:
- Complex block patterns
- Intricate sewing designs
| Technique | Description |
|---|---|
| Foundation Paper Piecing | Allows for precise sewing and intricate designs |
| Free-Motion Quilting | Enables you to create complex patterns and designs |
You’ll find that as you practice these techniques, your skills will improve, and your quilt tops will become more sophisticated.
Techniques such as foundation paper piecing and free-motion quilting will become your go-to methods for creating complex designs. Here are a few more techniques to explore:
- Appliqué
- Embroidery
| Technique | Description |
|---|---|
| English Paper Piecing | Perfect for creating intricate, precise designs |
| Hand Quilting | Allows for delicate, handmade stitching |
As you master these techniques, you’ll be able to create stunning, complex quilt designs that reflect your unique style and creativity.
Adding Batting and Backing
For a finished quilt, you’ll need to add batting and backing. This step gives your quilt warmth, texture, and stability. You’ll choose materials that complement your patchwork, ensuring a cohesive look.
Choosing the Right Batting
About the type of batting, consider factors like loft, material, and insulation. You’ll select one that suits your quilt’s purpose and your personal preference, thinking about how you want your quilt to feel and function.
Selecting a Coordinating Backing Fabric
Below your patchwork top, the backing fabric will add an extra layer of beauty. You’ll pick a fabric that complements your quilt’s colors and patterns, considering how it will enhance the overall design.
Understanding your backing fabric options, you can choose a single solid color, a subtle print, or an elaborate design. You’ll think about how the backing will interact with the front of your quilt, creating a harmonious and balanced look that showcases your patchwork skills, and makes your quilt truly special and meaningful to you.
Quilting and Finishing
Unlike other sewing projects, quilting and finishing a patchwork quilt requires patience and attention to detail. You will need to decide on a quilting pattern, choose a thread color, and prepare your quilt for binding.
Hand Quilting versus Machine Quilting
At this stage, you can choose between hand quilting and machine quilting, considering your skill level and the desired look. You can opt for hand quilting for a more traditional and personal touch or machine quilting for a faster and more uniform result.
Binding and Finishing Touches
Finishing your quilt with a beautiful binding is the final step. You can choose a coordinating fabric for the binding and attach it to the quilt using a sewing machine or by hand, making sure to fold the edges neatly.
Even after attaching the binding, you can add additional finishing touches, such as a label or a hanging sleeve, to make your quilt truly special. You can also consider adding a layer of batting to give your quilt extra warmth and texture, making it a cozy and inviting piece for your home. As you complete your quilt, you will feel a sense of accomplishment and pride in your handmade creation.
Summing up
Taking this into account, you now have a solid foundation to start your DIY patchwork quilt project. You can explore various designs and patterns to create a unique piece that reflects your style. For more inspiration, visit Easy Patchwork Quilt DIY tutorials, and get ready to showcase your handmade quilt with pride, enjoying the fruits of your labor in your cozy home, surrounded by your loved ones, and the warmth of your handmade creation.
FAQ
Q: What is a DIY patchwork quilt and how do I get started with making one?
A: A DIY patchwork quilt is a type of quilt that is made from small pieces of fabric sewn together to create a larger design. To get started, you will need a few basic sewing supplies, including a sewing machine, rotary cutter, and fabric scraps. You can begin by choosing a pattern or design, selecting your fabrics, and then cutting and sewing the pieces together. There are many online tutorials and YouTube videos available to help guide you through the process.
Q: What types of fabric are best suited for a DIY patchwork quilt?
A: The type of fabric you choose for your DIY patchwork quilt will depend on the look and feel you are trying to achieve. Cotton fabrics are a popular choice because they are soft, breathable, and easy to work with. You can also use a combination of cotton and other fabrics, such as wool or silk, to add texture and interest to your quilt. Consider choosing fabrics with a variety of colors, patterns, and textures to add depth and visual appeal to your quilt.
Q: How do I choose a pattern for my DIY patchwork quilt?
A: There are many different patterns to choose from when making a DIY patchwork quilt, from simple and traditional to complex and modern. You can find patterns online or in quilting books, or you can create your own design using graph paper and a pencil. Consider the skill level required for the pattern, as well as the amount of time and fabric you have available. Some popular patterns for beginners include the simple square patchwork and the strip quilt.
Q: What are some tips for sewing a DIY patchwork quilt?
A: One of the most important tips for sewing a DIY patchwork quilt is to use a consistent seam allowance throughout the quilt. This will help ensure that your pieces fit together evenly and that your quilt lies flat. You should also press your seams as you go to help the quilt lie flat and to prevent bulkiness. Additionally, use a walking foot or even feed foot on your sewing machine to help guide the fabric and prevent bunching or dragging.
Q: How do I finish and bind a DIY patchwork quilt?
A: Once you have completed the patchwork top of your quilt, you will need to layer it with batting and a backing fabric, and then bind the edges. You can choose from a variety of binding methods, including traditional double-fold binding, single-fold binding, or a decorative stitch. You will also need to add a label or signature to the back of the quilt, which can include your name, the date, and any other information you want to include. Finally, you can add any additional embellishments, such as quilting or appliques, to complete your DIY patchwork quilt.
