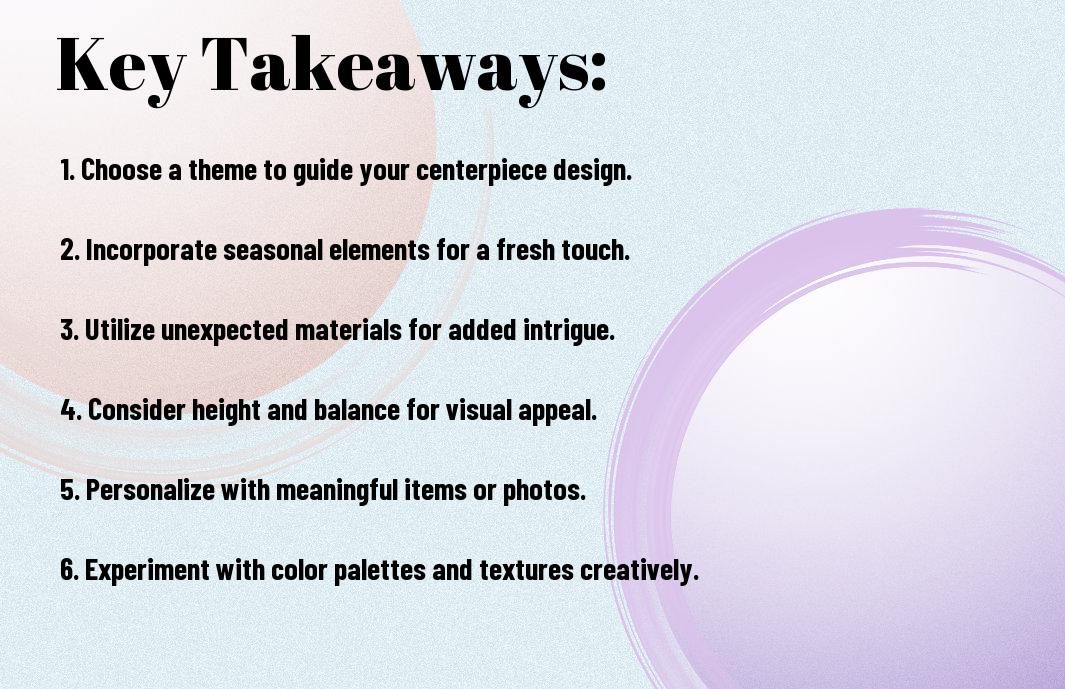
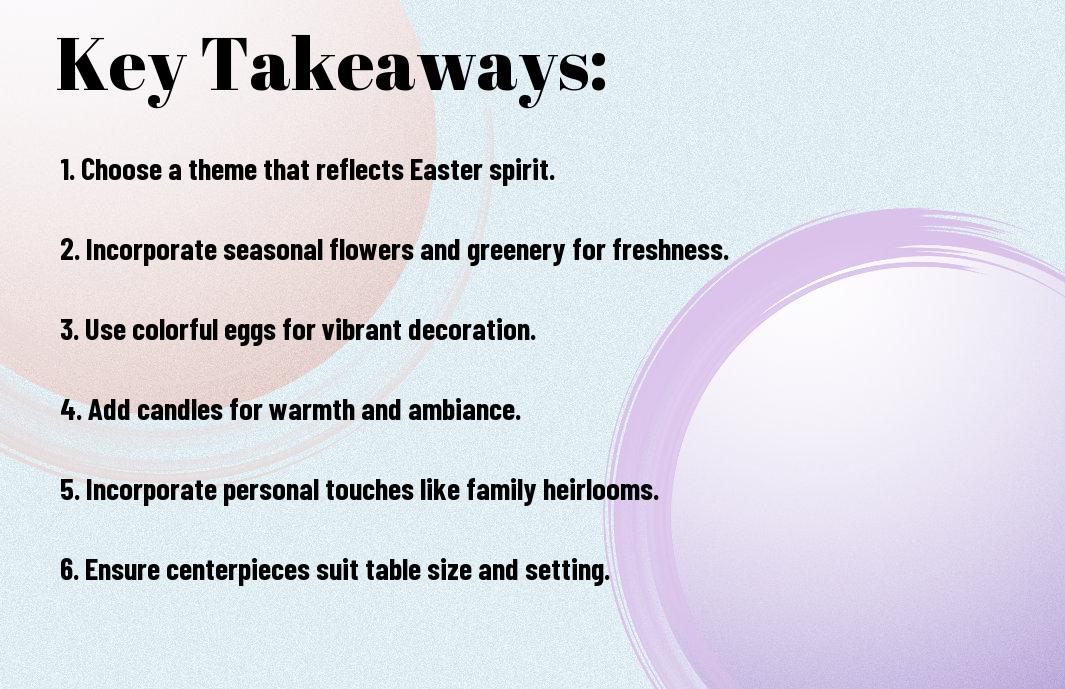
create

How to Create Easter Centerpieces

Key Takeaways:

To create beautiful and festive Easter centerpieces, consider the following points:

  • Use pastel colors and spring flowers to create a bright and cheerful atmosphere, symbolizing new life and renewal.
  • Incorporate Easter-themed decorations, such as bunnies, eggs, and candy, to add a playful touch to your centerpiece.
  • Combine natural elements, like branches and greenery, with decorative items, such as vases and ribbons, to create a unique and eye-catching Easter centerpiece that showcases your personal style and creativity.

Gather Materials

For a beautiful and memorable Easter centerpiece, you will need to collect a variety of items. Your choices will depend on the theme and style you have chosen for your decor. You can start by gathering basic items like vases, candles, and decorative accents.

Essential Items

Around this time, you’ll want to consider the necessary items that will form the foundation of your centerpiece, such as a base or container, floral foam, and any necessary tools like scissors or a hot glue gun.

Decorative Elements

Once you have your necessarys, you can think about the decorative elements that will add personality to your centerpiece, such as fresh flowers, greenery, or decorative eggs.

Plus, you can also consider adding other decorative elements like ribbons, bows, or small Easter-themed decorations to give your centerpiece a more polished and finished look. You can choose items that match your theme and style, and have fun experimenting with different combinations to find the perfect look for your Easter celebration.

Choose a Theme

It is important to select a theme for your Easter centerpiece to ensure a cohesive and beautiful arrangement. You can choose from various themes, such as traditional, modern, or vintage, to match your personal style and home decor. This will help you decide on the colors, flowers, and decorations to use in your centerpiece.

Traditional Easter

Against a backdrop of pastel colors and classic decorations, you can create a timeless Easter centerpiece. You will likely feature flowers, such as tulips or daffodils, and traditional Easter symbols, like bunnies or eggs, in your arrangement.
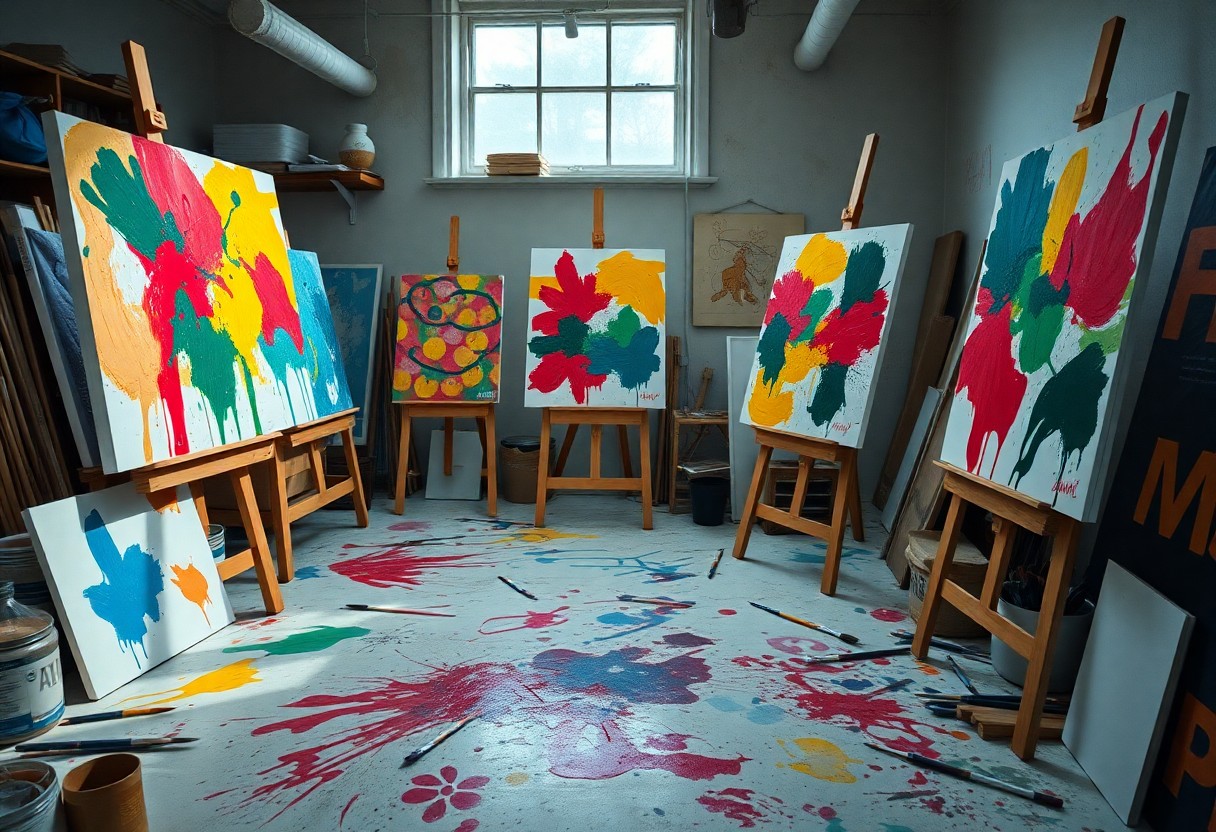
Modern Twist

Behind the scenes of a modern Easter centerpiece, you’ll find unique and innovative ideas. You can experiment with unconventional materials, like glass vases or metallic decorations, to add a touch of sophistication to your arrangement.

Understanding the modern twist theme, you can now think outside the box and incorporate unexpected elements, such as pebbles, branches, or candles, into your Easter centerpiece. You can also play with different textures and colors to create a visually appealing and modern arrangement that reflects your personal style.

Design Your Centerpiece

After selecting a theme, you can begin designing your Easter centerpiece. You will want to choose elements that complement your table setting and reflect the holiday’s vibrant colors and symbols.

Floral Arrangements

Beneath the Easter theme, beautiful flowers such as tulips and daffodils can add a pop of color to your centerpiece. You can arrange them in a vase or container that fits your theme and adds to the overall aesthetic of your table.

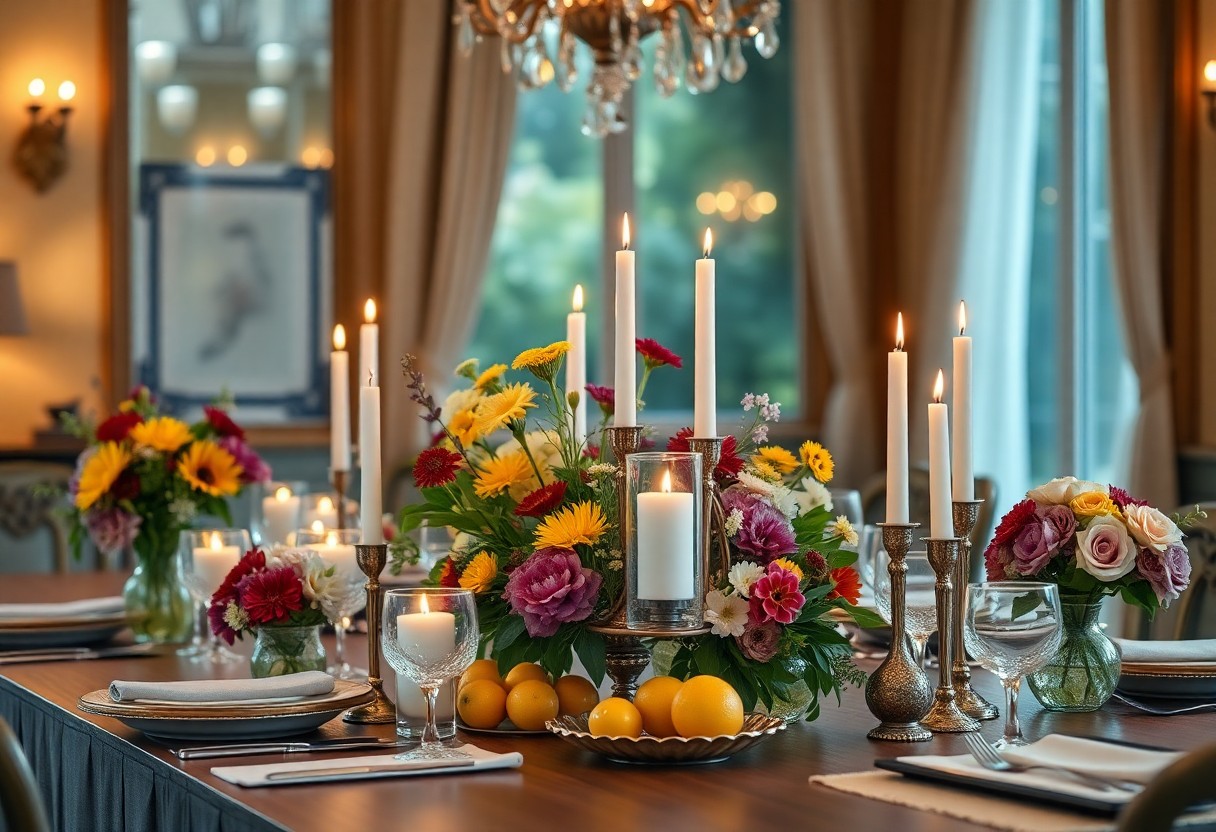
Candle and Decor Combinations

Decorating your centerpiece with candles, eggs, and other Easter decorations can create a warm and inviting ambiance. You can place candles in mercury glass holders or apothecary jars and surround them with small eggs, greenery, or other decorative elements.

Considering the combination of candles and decor, you can experiment with different heights and textures to add depth to your centerpiece. You can pair tall candlesticks with smaller decorative elements, such as tiny vases or wooden decorations, to create a visually appealing arrangement that showcases your personal style and sets the tone for a beautiful Easter celebration.

Add Easter-themed Decor

Unlike other holidays, Easter decor often features soft, pastel colors and whimsical characters, making it easy to create a beautiful centerpiece. You can incorporate your favorite Easter-themed items, such as bunnies, chicks, and eggs, to add a personal touch to your decor.

Bunnies and Chicks

Any addition of adorable bunnies and chicks will instantly evoke the spirit of Easter in your centerpiece. You can use figurines, pictures, or even stuffed animals to bring these beloved characters to life in your decor.

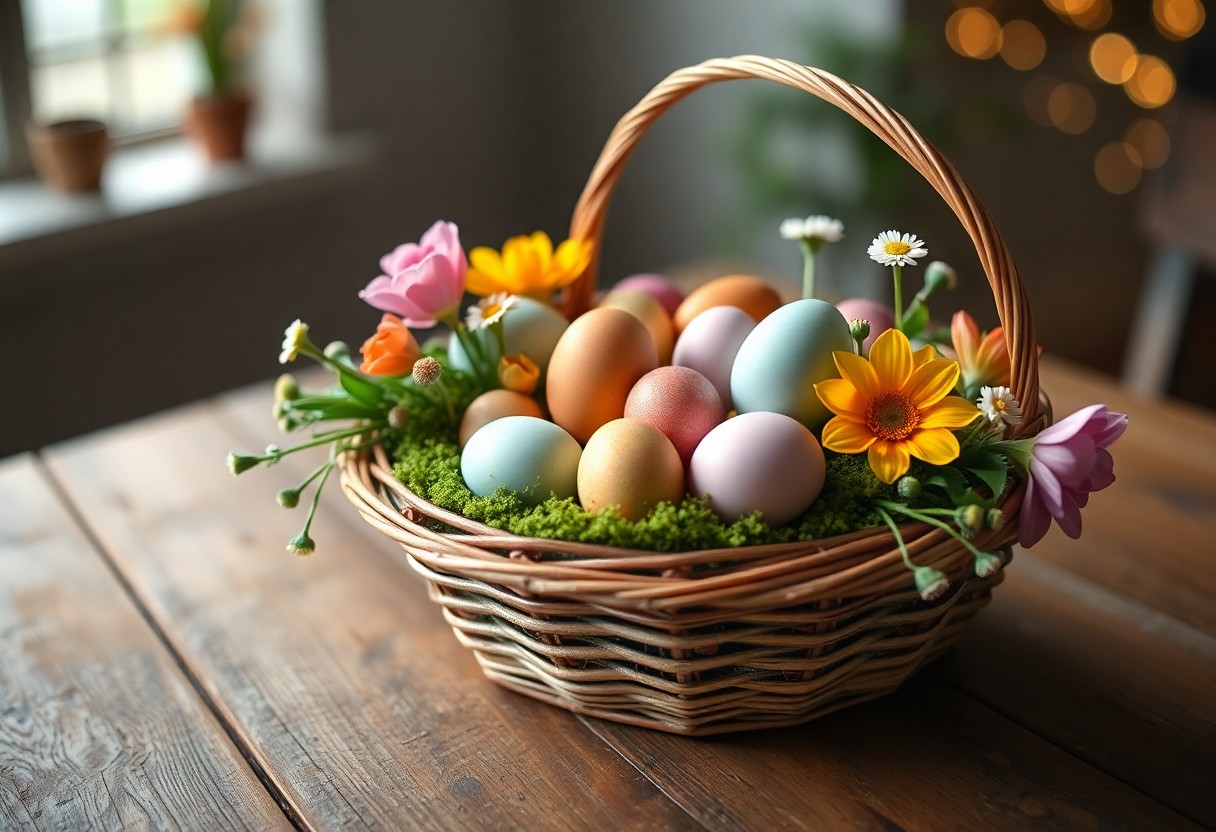
Easter Eggs and Baskets

One of the most iconic Easter symbols is the egg, and you can use decorated eggs or egg-shaped decorations to add a pop of color to your centerpiece. You can also incorporate Easter baskets, filled with flowers, grass, or other decorations, to create a beautiful and festive arrangement.

Also, consider using eggs and baskets in creative ways, such as hanging eggs from a branch or using a basket as a base for your centerpiece. You can fill the basket with flowers, greenery, or other decorations, and add a few strategically placed eggs to create a beautiful and eye-catching arrangement that reflects your personal style and adds a touch of elegance to your Easter celebration.

Consider the Color Scheme

Despite the numerous options available, selecting a color scheme for your Easter centerpiece can be a daunting task. You want to ensure that your arrangement complements the overall aesthetic of your dining table and reflects the festive spirit of the holiday.

Pastel Colors

Colors such as soft pink, baby blue, and pale yellow can create a beautiful and delicate ambiance for your Easter celebration. You can incorporate these hues through flowers, ribbons, or decorative eggs to add a touch of warmth and elegance to your centerpiece.

Bright and Bold Colors

Scheme your Easter centerpiece around vibrant colors like hot pink, turquoise, or sunshine yellow to make a statement. You can use these bold hues in your flowers, vases, or decorative accents to create a lively and energetic atmosphere.

Consequently, as you experiment with bright and bold colors, you’ll find that they can add a level of sophistication and whimsy to your Easter decor. You can balance these vibrant hues with neutral elements, such as white or clear glass, to prevent the arrangement from feeling overwhelming, and create a beautiful and eye-catching centerpiece that reflects your personal style.

Final Tips and Variations

Once again, consider your personal style when creating Easter centerpieces. You can:

  • Experiment with different colors
  • Try unique vases

Visit 850 Best Easter Centerpieces & Florals ideas for inspiration. Any creativity you bring to your centerpiece will make it special.

Mixing Textures and Heights

Textural elements can add depth to your Easter centerpiece. You can combine smooth, shiny objects with rough, natural ones to create visual interest, making your arrangement more dynamic and engaging.

Adding Personal Touches

Against a backdrop of elegant flowers, you can add personal touches that reflect your style and preferences, making your Easter centerpiece truly unique and meaningful to you and your family.

Mixing traditional and modern elements, you can create a one-of-a-kind Easter centerpiece that showcases your personality and adds a warm, inviting ambiance to your holiday table, making it a beautiful reflection of your taste and hospitality.

To wrap up

Hence, with these simple steps, you can create exquisite Easter centerpieces that will elevate your holiday decor. You will have transformed your space into a beautiful and inviting atmosphere, perfect for your family gathering. Your Easter celebration will be filled with joy, love, and stunning decorations that you have crafted with your own hands, making the holiday even more special and meaningful to you and your loved ones.

FAQ

Q: What materials do I need to create a beautiful Easter centerpiece?

A: To create a stunning Easter centerpiece, you will need a variety of materials such as fresh flowers like tulips, daffodils, or hyacinths, decorative vases or containers, Easter-themed decorations like eggs, bunnies, or chicks, greenery like eucalyptus or ferns, and some decorative items like ribbons, bows, or candles. You can also use recycled or natural materials like twigs, pinecones, or moss to add some texture and interest to your centerpiece.

Q: How do I choose the right flowers for my Easter centerpiece?

A: When choosing flowers for your Easter centerpiece, consider the color scheme and theme you want to achieve. Pastel colors like pink, blue, and yellow are traditional Easter colors, while white and cream-colored flowers can add a touch of elegance. You can also choose flowers that are in season, like tulips and daffodils, which are popular Easter flowers. Consider the shape and texture of the flowers as well, and mix different types to create a visually appealing arrangement.

Q: What are some creative ways to decorate my Easter centerpiece?

A: There are many creative ways to decorate your Easter centerpiece, such as adding decorative eggs, bunnies, or chicks to create a whimsical and playful look. You can also use ribbons and bows in pastel colors to add a pop of color and texture. Consider using natural elements like pinecones, twigs, or moss to add some earthy charm to your centerpiece. Additionally, you can use candles, pebbles, or marbles to create a beautiful and unique centerpiece.

Q: How do I arrange my Easter centerpiece to make it look visually appealing?

A: To arrange your Easter centerpiece, start by adding a base layer of greenery like eucalyptus or ferns to the vase or container. Then, add the main flowers or decorative items, working your way around the arrangement to create a balanced and symmetrical look. Consider creating a focal point, like a large decorative egg or a cluster of flowers, and then balance it with other elements. Finally, add some finishing touches like ribbons, bows, or candles to complete the look.

Q: Can I create an Easter centerpiece on a budget, and what are some affordable alternatives?

A: Yes, you can create a beautiful Easter centerpiece on a budget. Consider using affordable flowers like carnations or baby’s breath, or using silk flowers instead of fresh ones. You can also use items you already have at home, like vases, jars, or containers, and decorate them with ribbons, bows, or paint. Additionally, look for affordable decorative items like eggs, bunnies, or chicks at dollar stores or thrift shops. With a little creativity, you can create a stunning Easter centerpiece without breaking the bank.

How to Create Unique Centerpieces

As you begin on the art of crafting exquisite centerpieces, your imagination knows no bounds. With a dash of creativity and a pinch of flair, you can transform any setting into a masterpiece. You will discover the secrets to designing one-of-a-kind arrangements that exude elegance and sophistication, leaving your guests in awe of your exceptional taste. Your unique centerpieces will be the crowning jewel of any gathering, a true reflection of your refined style and artistic expression.

Key Takeaways:

To create unique centerpieces, consider the following points:

  • Start with a theme or concept to guide your design decisions and ensure a cohesive look, whether it’s a wedding, holiday, or other special occasion.
  • Combine unconventional materials, such as natural elements, vintage items, or repurposed objects, to add visual interest and create a one-of-a-kind centerpiece.
  • Play with scale and proportion by mixing large and small elements, and balance bold colors with neutral tones to create a dramatic and eye-catching centerpiece that draws attention.

    Defining Your Style

    Your personal taste and aesthetic play a significant role in creating unique centerpieces that reflect your individuality, so take a moment to consider what inspires you, from the elegance of a bygone era to the simplicity of modern design.

    Considering the Occasion

    By taking into account the nature of the gathering, you can tailor your centerpiece to perfectly complement the atmosphere, whether it’s a lavish wedding or an intimate dinner party, and make a lasting impression on your guests.

    Exploring Your Personality

    Around every corner, your personality shines through in the details, and your centerpiece is no exception, allowing you to express your creativity and flair, and make a statement that is quintimperatively you.

    Occasion aside, your personality is the true star of the show, and as you explore the vast array of possibilities, you’ll discover that your centerpiece is a reflection of your inner world, a symphony of colors, textures, and shapes that resonate with your very being, and invite your guests to experience the essence of your hospitality.

    Gathering Inspiration

    If you’re looking to create unique centerpieces, you’ll want to start by gathering inspiration from various sources. This can be a fascinating process, as you explore different ideas and themes to find the perfect fit for your occasion. Your creativity will be sparked by the world around you, and you’ll begin to envision the perfect centerpiece.

    Nature’s Influence

    Beneath the beauty of the natural world, you’ll discover a wealth of inspiration for your centerpieces. Between the intricate patterns on a leaf and the vibrant colors of a sunset, you’ll find endless ideas to incorporate into your design. Your centerpieces can be a reflection of the beauty that surrounds you, bringing a touch of elegance to your table.

    Cultural and Artistic References

    Across the globe, you’ll find a diverse array of cultural and artistic influences that can inspire your centerpieces. Amidst the masterpieces of art history and the treasures of cultural heritage, you’ll uncover a rich tapestry of ideas to draw upon. Your centerpieces can be a celebration of the artistic and cultural expressions that inspire you, adding a sophisticated touch to your occasion.

    In addition to exploring cultural and artistic references, you can examine deeper into the world of art history, discovering the intricate details and symbolism that can elevate your centerpieces. You can draw inspiration from the opulence of Baroque interiors, the elegance of Art Deco, or the simplicity of minimalist design, allowing your creativity to flourish as you craft unique and captivating centerpieces that reflect your personal style and aesthetic.

    Selecting Materials

    Choosing Colors and Textures

    To add depth and visual interest to your centerpiece, you will want to thoughtfully choose colors and textures that harmonize with one another, creating a symphony of sensations that delight the eye and inspire the imagination, as you strive to craft a true work of art.

    Working with Flowers and Greenery

    The art of working with flowers and greenery is a delicate one, requiring a gentle touch and an discerning eye, as you select the perfect blooms and foliage to bring your vision to life, and you will be amazed at the transformation that occurs when you combine these elements in a way that is both unexpected and sublime.

    With flowers and greenery, you have the opportunity to add a touch of elegance and sophistication to your centerpiece, and as you experiment with different combinations, you will discover the perfect balance of colors, textures, and forms to create a truly breathtaking arrangement that showcases your unique style and flair, and you will be delighted by the way your creation enhances the ambiance of the room, making it a true masterpiece of decor.

    Adding Decorative Elements

    Despite the simplicity of your centerpiece, it can be elevated to an exquisite creation with the right decorative elements. You can choose from a variety of items to add a touch of elegance and sophistication to your design. Your selection will depend on the theme and style of your event, as well as your personal taste and preference.

    Candles and Lighting

    Above all, candles and lighting can add a warm and inviting ambiance to your centerpiece. You can use candelabras, lanterns, or string lights to create a soft glow that will enhance the overall aesthetic of your design. Your choice of lighting will set the tone for the entire atmosphere of the room.

    Unique Objects and Accessories

    About the most interesting aspect of creating a unique centerpiece is the ability to incorporate unusual objects and accessories. You can use vintage items, flowers, or other decorative elements to add a touch of personality to your design. Your creativity and imagination are the only limits to what you can create.

    With your unique objects and accessories in place, you can now think about how to arrange them in a way that is visually appealing. You can experiment with different heights, textures, and colors to create a balanced and harmonious composition that will draw the eye to your centerpiece. Your goal is to create a stunning focal point that will be the talk of the evening, and with a little creativity, you can achieve just that.

    Balancing and Harmonizing

    Keep in mind that a well-designed centerpiece is all about balance and harmony, creating a visual equilibrium that delights the eye and elevates the ambiance of the entire space, as you strive to create a unique and captivating atmosphere.

    Symmetry and Asymmetry

    Betwixt the two extremes of perfectly symmetrical and utterly asymmetrical designs, you will find a plethora of creative possibilities, as you experiment with different arrangements to find the perfect blend that suits your taste and style.

    Creating Visual Interest

    Beside the basic principles of design, your centerpiece should also incorporate elements that spark curiosity and intrigue, drawing the viewer’s eye and inviting them to linger, as you carefully select each component to create a rich and engaging visual experience.

    Considering the multitude of options available, you may choose to combine different textures, colors, and shapes to add depth and visual interest to your centerpiece, thereby creating a truly unique and captivating focal point that reflects your personal style and flair, as you skillfully balance aesthetics and creativity to produce a masterpiece that is at once elegant and sophisticated.

    Final Touches

    Many details can make or break the ambiance of your centerpiece, so take your time to perfect it. You have carefully selected each element, and now it’s time to bring them all together in harmony. Your creativity and attention to detail will make your centerpiece truly unique.

    Adding a Personal Message

    Messaging is key to making your centerpiece meaningful, so consider adding a personal touch, such as a monogram or a special quote, to make it truly yours. You can inscribe it on a decorative stone, a mirror, or even a flower petal, and it will add an intimate feel to your arrangement.

    Making it Seasonal

    Against the backdrop of the current season, your centerpiece can take on a whole new level of significance. You can incorporate seasonal flowers, branches, or fruits to create a sense of continuity with nature. Your arrangement will be a beautiful reflection of the time of year, and a great conversation starter.

    Also, as you make your centerpiece seasonal, you can experiment with different textures, colors, and scents to evoke the essence of the season. You can use pinecones, holly, or evergreen branches for a winter wonderland feel, or sunflowers, daisies, and lemon slices for a bright and cheerful summer arrangement, the possibilities are endless, and it’s up to you to unleash your creativity.

    Final Words

    Considering all points, you now possess the art of creating unique centerpieces that elevate your space with elegance and sophistication. With your imagination and creativity, you will craft masterpieces that reflect your refined taste, making every gathering a testament to your exceptional style, and as you adorn your table, you will undoubtedly leave a lasting impression on your guests, for in the world of decor, your personal touch is the greatest luxury of all, and it is yours to indulge in.」

    FAQ

    Q: What are some unique ideas for creating centerpieces for a special event or wedding?

    A: There are many unique ideas for creating centerpieces, including using vintage items, such as old lanterns, bottles, or candelabras, and filling them with flowers, greens, or other decorative elements. You can also use natural elements, such as branches, rocks, or driftwood, to create a beautiful and rustic centerpiece. Additionally, you can incorporate personal items, such as photos, seashells, or other mementos, to make the centerpieces more meaningful and personalized.

    Q: How can I choose the right flowers and greenery for my centerpieces?

    A: Choosing the right flowers and greenery for your centerpieces depends on the theme, color scheme, and style of your event. Consider the season and what flowers are in bloom to ensure freshness and availability. You can also mix and match different textures, colors, and shapes to create a unique and visually appealing arrangement. Don’t be afraid to experiment and combine different elements, such as roses, peonies, and eucalyptus, to create a stunning centerpiece.

    Q: What are some creative ways to use lighting in my centerpieces?

    A: Lighting can add an extra layer of ambiance and drama to your centerpieces. Consider using candles, fairy lights, or string lights to create a warm and inviting glow. You can also use LED lights or uplighting to highlight specific elements, such as flowers or decorative objects. Another idea is to use lanterns or glass votives with candles or LED lights inside to create a beautiful and soft luminescence.

    Q: How can I add a personal touch to my centerpieces?

    A: Adding a personal touch to your centerpieces can make them more meaningful and special. Consider incorporating personal items, such as photos, heirlooms, or other mementos, into the arrangement. You can also use customized elements, such as monograms, special dates, or meaningful quotes, to make the centerpieces more unique and personalized. Additionally, you can use elements that reflect your personal style, such as vintage items, antique furniture, or other decorative objects that reflect your interests and hobbies.

    Q: What are some tips for creating centerpieces on a budget?

    A: Creating centerpieces on a budget requires some creativity and resourcefulness. Consider using items you already have at home, such as vases, bottles, or other containers, and filling them with fresh flowers, greens, or other decorative elements. You can also shop at local markets, thrift stores, or second-hand shops to find unique and affordable items. Another idea is to keep the centerpieces simple and understated, using a few statement pieces rather than a lot of expensive elements. By being creative and flexible, you can create beautiful and unique centerpieces without breaking the bank.

How to Make Art Fun

Key Takeaways:

To make art fun, consider the following points:

  • Embracing Creativity and Imagination allows individuals to express themselves freely and enjoy the process of making art, regardless of the outcome.
  • Using a variety of Colors and Textures can add depth and visual interest to artwork, making it more engaging and enjoyable to create.
  • Experimenting with different Techniques and Mediums can help keep the artistic process fresh and exciting, preventing boredom and encouraging Innovation.

Embracing Imagination

A key aspect of making art fun is letting your creativity shine. As you tap into your imagination, you’ll find that your artistic expression becomes more vibrant and engaging. You’ll begin to see the world in a new light, and your art will reflect this fresh perspective.

Letting Go of Perfection

Besides the need for control, perfection can stifle your creativity. As you create, try to let go of your expectations and simply enjoy the process. You’ll find that your art becomes more authentic and expressive when you’re not worried about making mistakes.

Exploring New Mediums

Towards the beginning of your artistic journey, you may find that exploring different mediums helps you discover your unique style. You’ll have the opportunity to try various techniques and tools, and you’ll learn what works best for you.

A major benefit of exploring new mediums is that it allows you to break out of your comfort zone and try new things. As you experiment with different materials and techniques, you’ll find that your art evolves and becomes more interesting. You’ll develop a sense of curiosity and playfulness, and your creative journey will become even more enjoyable.

Finding Inspiration

One of the most significant steps in making art fun is finding inspiration that sparks your creativity and motivates you to create something unique and meaningful. As you begin on this journey, you’ll discover that inspiration can be found in various aspects of your life, waiting to be tapped into and explored.

Observing the World Around You

Widening your perspective, you start to notice the intricate details and beauty that surrounds you, from the way light falls on objects to the vibrant colors of nature, all of which can serve as a catalyst for your artistic expression, encouraging you to capture these moments in your art.

Drawing from Personal Experiences

Wrapping your mind around your own life experiences, you can use them as a rich source of inspiration, drawing from memories, emotions, and lessons learned to create art that is authentic and reflective of your journey, allowing you to express yourself in a way that is both therapeutic and fulfilling.

The more you research into drawing from personal experiences, the more you’ll find that your art becomes a powerful tool for self-expression and communication, enabling you to convey complex emotions and ideas in a unique and captivating way, and as you continue to create, you’ll discover that your art not only reflects your world but also shapes your perspective on it, inviting you to see things from new and exciting angles, and inspiring you to continue exploring and creating.

Setting Up Your Creative Space

For a fun and engaging art experience, you’ll want to set up a space that sparks your creativity. Check out How to Have Fun With Art – Mary B. Golubich – Medium for inspiration. This will help you get started on your artistic journey.

Organizing Your Materials

Spacious areas with organized materials will help you focus on your art. You’ll find that having your supplies within reach makes the creative process more enjoyable.

Creating a Comfortable Environment

Amidst the chaos of everyday life, your creative space should be a haven. You’ll want to create an atmosphere that fosters relaxation and inspires you to make art.

Understanding what makes you comfortable is key to creating a space that works for you. You’ll want to consider factors like lighting, temperature, and noise level when setting up your creative space, allowing you to fully express yourself and have fun with your art.

Experimenting with Techniques

After exploring various art forms, you’ll discover that techniques can make or break your creative process. Trying out different methods will help you find what works best for you, and you’ll be amazed at how your art evolves.

Trying New Styles and Methods

By broadening your artistic horizons, you’ll stumble upon unique styles and methods that resonate with your vision, allowing you to express yourself in innovative ways and tap into your full creative potential.

Practicing and Refining Your Skills

Styles and techniques will become second nature as you continue to practice, and your art will flourish as you refine your skills, developing a distinctive voice that sets your work apart.

In fact, the more you practice, the more you’ll discover what makes your art special, and you’ll begin to see improvement, which will motivate you to continue experimenting and pushing the boundaries of your creativity, leading to a more fulfilling and enjoyable artistic journey.

Overcoming Creative Blocks

To overcome creative blocks, you need to shift your perspective and find new ways to stimulate your imagination. This can be achieved by trying different approaches and seeking inspiration from various sources.

Taking Breaks and Stepping Away

Often, on the verge of a creative breakthrough, you may feel stuck. On such occasions, taking a break and stepping away from your work can help you clear your mind and come back to your project with renewed energy and focus.

Seeking Out New Sources of Inspiration

Against all odds, you can find inspiration in unexpected places. Against the familiar, try exploring new environments, talking to different people, or engaging in unconventional activities to spark your creativity.

Sources of inspiration are all around you, and it’s up to you to discover them. You can find inspiration in nature, art, music, or even everyday conversations. By opening yourself to new experiences and sensations, you can fuel your imagination and overcome creative blocks, allowing you to make progress on your artistic journey and have fun while doing it.

Sharing Your Art with Others

Your art is a reflection of your unique perspective and creativity, and sharing it with others can be a wonderful way to connect and inspire. By putting your work out into the world, you open yourself up to new experiences, feedback, and opportunities for growth.

Joining a Community or Class

Becoming part of a community of like-minded artists can help you stay motivated and inspired, and provide valuable support and guidance as you continue to develop your craft, you will be able to learn from others and share your own knowledge and skills.

Showcase Your Work Online or Locally

Community is key when it comes to getting your art seen, and there are many ways to showcase your work, from local galleries and exhibitions to online platforms and social media, you can choose the method that best suits your style and goals.

Locally, you can look for art fairs, festivals, and other events where you can display your work and connect with potential fans and buyers, you can also consider partnering with local businesses or organizations to showcase your art in their spaces, and as you share your art with others, you will find that it brings you a sense of pride and fulfillment, and helps you to continue growing and evolving as an artist.

Summing up

As a reminder, making art fun is all about embracing your creativity and letting your imagination run wild. You’ve learned how to unlock your potential and bring your ideas to life. With these tips, you’ll be able to tap into your inner artist and make the creative process an enjoyable experience. Your art will flourish, and you’ll have a blast making it happen, discovering new talents and passions along the way, and enjoying the journey of self-expression.

FAQ

Q: What is the best way to get started with making art fun for beginners?

A: To make art fun for beginners, it’s vital to start with simple and engaging projects that allow for creativity and experimentation. This can include activities like drawing, painting, or crafting, using accessible materials like colored pencils, watercolors, or clay. Setting up a comfortable and inspiring workspace, free from distractions, can also help foster a sense of fun and creativity. Additionally, following tutorials or taking a class can provide guidance and motivation to help beginners get started and enjoy the process of making art.

Q: How can I make art-making a regular and enjoyable activity?

A: To make art-making a regular and enjoyable activity, try setting aside a specific time each week dedicated to creating. This could be as simple as 30 minutes each day or a couple of hours on the weekend. Consistency is key to developing a habit and allowing yourself to explore different techniques and mediums. Joining a local art group or finding an art buddy can also provide accountability, support, and opportunities to learn from others, making the experience more fun and engaging. Furthermore, rewarding yourself after reaching certain milestones or completing projects can add an extra layer of motivation and satisfaction.

Q: What role does experimentation play in making art fun?

A: Experimentation plays a significant role in making art fun as it allows individuals to explore different mediums, techniques, and styles without the fear of failure. Trying new things and taking risks can lead to unexpected discoveries and learning opportunities, which are central to the enjoyment of the creative process. Experimentation can involve mixing different materials, testing various tools, or stepping out of your comfort zone to tackle challenging projects. This approach not only keeps the artistic journey interesting but also fosters personal growth and a deeper understanding of one’s creative capabilities.

Q: How can I overcome self-doubt and criticism when making art for fun?

A: Overcoming self-doubt and criticism when making art for fun involves adopting a mindset that values the process of creation over the end result. Focusing on the enjoyment of making art, rather than the need for perfection, can help alleviate self-doubt. Additionally, practicing self-compassion and acknowledging that mistakes are an integral part of the learning process can be beneficial. Sharing work with supportive friends or joining a community that encourages positive feedback can also help build confidence and provide a sense of belonging among fellow artists. Moreover, celebrating small achievements and the progress made over time can reinforce a positive self-image and encourage continued engagement with art-making.

Q: Can making art be a form of stress relief and relaxation?

A: Yes, making art can be a highly effective form of stress relief and relaxation. The act of creating can distract from daily worries, providing a mental escape and allowing individuals to focus on the present moment. The repetitive motions involved in certain art forms, such as drawing or knitting, can be meditative, helping to calm the mind and reduce anxiety. Furthermore, the sense of accomplishment that comes from completing a project can boost mood and self-esteem, contributing to an overall feeling of well-being. Many people find that engaging in artistic activities helps them unwind and recharge, making it a valuable tool for maintaining mental health and managing stress.

How to Create Personalized Journals

As you commence on the journey of creating your own personalized journal, you’ll discover a world of self-expression and introspection. You’ll have the freedom to craft a space that reflects your unique voice and style, a sanctuary where your thoughts and dreams can unfold. With each page, you’ll weave a tapestry of your inner world, allowing your creativity to flourish and your imagination to soar. Your journal will become a treasured companion, a reflection of your soul, and a testament to the beauty of your inner life.

Key Takeaways:

To create personalized journals, consider the following points:

  • Start with a clear theme or purpose for the journal, such as a travel diary, gratitude log, or daily reflection book, to help guide the design and content of the journal.
  • Use customizable templates or prompts to make the journal more engaging and personally relevant to the user, allowing them to express themselves and track their progress over time.
  • Incorporate unique features such as photos, artwork, or inspirational quotes to make the journal more visually appealing and reflective of the user’s personality and style.

Setting Up Your Journal

Before you begin, consider visiting Custom Journals and Notebooks to explore your options. As you set up your journal, think about what you want to achieve with this personal space.

Choosing the Right Format

One of the first decisions you’ll make is the format of your journal. You might prefer a sleek, modern design or a more traditional, classic look. Consider what inspires you and what will make you want to use your journal regularly.

Selecting Meaningful Prompts

Below the surface of your journal’s design, you’ll want to think about the prompts that will guide your writing. You might choose quotes, poems, or questions that resonate with you, helping you to reflect on your thoughts and feelings.

Another aspect to consider when selecting meaningful prompts is how they will help you explore your goals, desires, and values. As you write, you’ll begin to uncover patterns and insights that will deepen your understanding of yourself, and your journal will become a trusted companion on your journey of self-discovery, a space where you can nurture your mind and spirit.

Designing Your Journal

Some of the most beautiful journals are those that reflect your unique personality and style. As you design your journal, consider the colors, patterns, and textures that bring you joy and inspire your creativity. You can choose a theme or aesthetic that resonates with your interests or personality, setting the tone for a truly personalized space.

Adding Personal Touches

Any element that holds personal significance can be incorporated into your journal, making it a true reflection of your inner world. You can add photos, tickets, or other memorabilia to create a visually interesting and meaningful space that invites your thoughts and reflections.

Incorporating Inspirational Quotes

To elevate your journal to a source of inspiration, consider adding quotes that resonate with your goals and aspirations. You can choose quotes from your favorite authors, poems, or songs, and place them throughout your journal to motivate and guide you.

Quotes have a way of capturing the essence of our deepest desires and highest aspirations, and placing them in your journal can be a powerful way to focus your intentions and cultivate a positive mindset. As you flip through the pages of your journal, you will encounter these quotes, and they will serve as a reminder of your goals and values, encouraging you to stay true to your vision and pursue your dreams with passion and purpose.

Writing in Your Journal

Keep your journal handy, and let your thoughts flow onto its pages. As you write, allow yourself to reflect on your experiences, emotions, and desires. Your journal is a sacred space for self-expression, where you can be your authentic self.

Establishing a Writing Routine

With each passing day, cultivate the habit of writing in your journal. Set aside a quiet moment, and let your pen dance across the page, filling it with your innermost thoughts and feelings. As you establish this routine, you’ll find your journal becoming an integral part of your life.

Exploring Different Writing Styles

Across the pages of your journal, you’ll discover various writing styles that resonate with you. You might find solace in poetry, or perhaps prose is more to your liking. Experiment with different formats, and allow your journal to evolve into a unique reflection of your personality.

Exploring different writing styles will help you tap into your creative potential, and uncover new aspects of yourself. As you experiment with various forms of writing, you’ll find that your journal becomes a canvas of self-discovery, where you can express yourself honestly and authentically. You’ll begin to notice patterns, themes, and emotions that emerge, offering you a deeper understanding of your inner world, and guiding you towards a more intentional, meaningful life.

Customizing Your Journal

Your journal is a reflection of your inner world, and customizing it allows you to infuse it with your unique personality and style. As you begin to personalize your journal, you’ll find that it becomes an extension of yourself, a sacred space where your thoughts and feelings can unfold.

Adding Photographs and Mementos

Along with your written words, you can adorn your journal with photographs and mementos that resonate with your soul. These visual elements will add depth and texture to your journal, making it a treasured keepsake that celebrates your life’s journey.

Creating a Personalized Cover

To craft a cover that truly reflects your essence, you can use a variety of materials, such as colorful papers, fabrics, or found objects, to create a collage that speaks to your heart. This outer layer will set the tone for the treasures that lie within, inviting you to fill the pages with your innermost thoughts and reflections.

Creating a personalized cover is an act of self-expression, allowing you to convey your personality and style to the world. As you design your cover, you’ll find that it becomes a meditation on your inner self, a chance to distill your essence into a visual representation that is uniquely yours. You can experiment with different textures, colors, and patterns, weaving together a tapestry that reflects your soul’s vibration, and sets the stage for the intimate dialogue that will unfold within the pages of your journal.

Making Journaling a Habit

Not only will journaling become a therapeutic outlet, but it will also allow you to tap into your creativity and reflect on your thoughts and feelings. As you commit to this practice, you will find that it brings a sense of calm and clarity to your life.

Setting Reminders and Goals

Jotting down your intentions and scheduling journaling time will help you stay committed to your practice, and you will find that setting specific goals for your journaling will give you a sense of direction and purpose.

Overcoming Writer’s Block

Around the times when you feel stuck, take a few deep breaths and allow yourself to freely write whatever comes to mind, without worrying about grammar or spelling, and you will find that your thoughts begin to flow effortlessly onto the page.

In addition, when you encounter writer’s block, try changing your environment or writing at a different time of day, and you will discover that a fresh perspective can inspire new ideas and insights, allowing you to continue exploring your thoughts and feelings in your journal.

Advanced Journaling Techniques

Once again, you’ll find yourself immersed in the world of journaling, where

  1. techniques await

to unlock your creativity.

Technique Description

Experimenting with Different Media

Before stepping into new techniques, consider the media you use, as it can greatly impact your journaling experience.

Reflecting on Your Progress

Below the surface of your journal’s pages, a story of growth and self-discovery unfolds, as you reflect on your progress.

In addition, as you explore deeper into reflecting on your progress, you’ll begin to notice patterns and themes emerging, allowing you to refine your journaling practice and cultivate a deeper understanding of yourself.

Conclusion

Conclusively, as you commence on the journey of creating your personalized journal, you will discover the profound joy of curating a space that reflects your inner world. You will weave your thoughts, emotions, and experiences into a tapestry of self-expression, and in doing so, you will unlock the doors to your deepest desires and aspirations. Your journal will become a sacred sanctuary, a mirror to your soul, where you can retreat, reflect, and rediscover yourself.

FAQ

Q: What is the first step in creating a personalized journal?

A: The first step in creating a personalized journal is to define the purpose of the journal. This could be for daily reflection, goal setting, sketching, or writing. Understanding the journal’s purpose will help guide the design and content, ensuring it meets your needs and preferences.

Q: How do I choose the right size and format for my personalized journal?

A: Choosing the right size and format for your personalized journal depends on your intended use and personal preference. Consider a larger size for art or sketching, a smaller size for daily carrying, and a standard size for writing. You can also decide between a hardcover or softcover, and whether you prefer lined, grid, or blank pages.

Q: What kinds of customization options are available for personalized journals?

A: Personalized journals offer a wide range of customization options. You can choose the cover material, color, and design, as well as add your name, initials, or a special message. Inside, you can select the type of paper, the ruling (lined, grid, dotted, etc.), and even add custom sections or prompts tailored to your journal’s purpose.

Q: How can I make my personalized journal more engaging and effective?

A: To make your personalized journal more engaging and effective, consider adding prompts, quotes, or inspiring images. You can also experiment with different writing tools, such as pens, pencils, or markers, to vary the look and feel of your entries. Additionally, incorporating photos, tickets, or other memorabilia can add depth and personal significance to your journal.

Q: Can I create a personalized journal digitally, or do I need to use physical materials?

A: You can create a personalized journal both digitally and physically. Digital options include using a tablet or smartphone with a journaling app, or designing your journal on a computer and then printing it. For a physical journal, you can use a blank book and decorate it yourself with paint, stickers, or other craft supplies. Many companies also offer online design tools where you can create your journal digitally and then have it printed and shipped to you.

How to Create Abstract Art

You stand in front of a blank canvas, eager to create something unique. Your mind is filled with ideas, but you’re not sure where to start. You’ll begin by experimenting with different materials and techniques, allowing your instincts to guide your brushstrokes. As you work, you’ll uncover your own style, and your abstract art will take shape. With each stroke, you’ll move closer to creating a piece that reflects your vision and emotion.

Key Takeaways:

To create stunning abstract art, consider the following points:

  • Start with a concept or emotion that inspires you, and let it guide your creative process to produce a unique piece of art.
  • Experiment with different techniques, such as layering, texturing, and color blending, to add depth and visual interest to your artwork.
  • Embrace spontaneity and intuition, allowing yourself to make bold and expressive brushstrokes or marks that convey your creative vision.

Preparing the Space

A clean and organized space is crucial for creating abstract art. You can find inspiration on how to start your project by visiting 8 Fun Ways to Start an Abstract Painting to get your creative juices flowing.

Gathering Materials

Materials needed for your abstract art project should be readily available, including paints, brushes, and canvas, so you can focus on the creative process.

Setting up the Environment

Before you begin, set up your workspace to promote productivity and comfort, ensuring good lighting and ventilation to help you stay focused.

And as you arrange your workspace, consider the flow of your creative process, keeping frequently used items within easy reach, allowing you to move freely and concentrate on bringing your abstract art vision to life, with your space now ready for you to express yourself.

Exploring Techniques

Now that you’ve started creating abstract art, it’s time to experiment with different methods to find what works best for you. You’ll discover various techniques to express your unique style.

Experimenting with Colors

With a wide range of colors at your disposal, you can create unique combinations that evoke emotions and convey meaning. You’ll find that certain colors work well together, while others clash, allowing you to refine your palette.

Playing with Textures

Along with color, texture plays a significant role in abstract art, adding depth and visual interest to your work. You can use various materials to create different textures, from smooth to rough, to enhance your art.

Finding Inspiration

After deciding to create abstract art, you need to find inspiration. Your surroundings, experiences, and emotions can spark ideas. Look for things that evoke feelings or stimulate your mind.

Looking at Nature

Above all, nature is a great source of inspiration. You can observe its patterns, colors, and textures to influence your art. Take note of the shapes and forms that appeal to you.

Drawing from Emotions

Around you, emotions are constantly shifting. You can tap into your feelings to create unique and personal art. Your emotions can guide your color choices and brushstrokes.

Finding your emotional state is key to creating authentic abstract art. You can explore your feelings by reflecting on your experiences, thoughts, and sensations. This will help you to express yourself honestly and create art that resonates with others.

Creating the Composition

Balancing Elements

The key to a great composition is balance. You’ll balance your elements, like color and shape, to create a sense of harmony in your artwork. You’ll place each element deliberately, considering how it affects your overall piece.

Considering Negative Space

Around your artwork, negative space plays a significant role. You’ll use it to create a sense of simplicity and focus attention on specific elements. Your negative space will help your artwork breathe, making it more dynamic.

Even when you think you’ve got your composition right, take a step back and look at your negative space. You’ll see how it affects your artwork’s overall feel and flow. You can adjust your elements to use negative space effectively, creating a more engaging piece that draws your viewer in.

Adding Layers and Depth

Once again, you’ll find yourself lost in the process of creating abstract art. You’ll add layers, building up your piece, and watching it evolve. Your colors will blend, your textures will deepen, and your art will take on a life of its own.

Building Up Colors

Among the many techniques you can use, building up colors is one of the most effective. You’ll start with a base coat, then add layers of paint, each one interacting with the last, creating a rich and vibrant palette that draws the viewer in.

Incorporating Patterns

For your art to truly come alive, you’ll need to incorporate patterns. You’ll use shapes, lines, and textures to create a sense of movement and energy, drawing the viewer’s eye through your piece.

This pattern work will add an extra layer of complexity to your art, making it more interesting and engaging. You’ll experiment with different patterns, finding the ones that work best with your colors and textures, and using them to create a sense of tension and balance in your piece.

Refining the Piece

All aspects of your abstract art piece should come together during this stage. You evaluate your work, making adjustments to create a cohesive whole.

Stepping Back and Evaluating

About now, you should take a step back and assess your piece. You are looking for balance, harmony, and a sense of completeness.

Making Final Adjustments

An eye for detail is necessary as you make your final adjustments. You tweak and refine, ensuring every element serves your artistic vision.

Indeed, making final adjustments is where your abstract art piece truly comes alive. You refine colors, textures, and composition, trusting your instincts to guide you. Your goal is to create a piece that resonates with you, and by extension, your audience, drawing them into the world you’ve created.

Final Words

Drawing together the threads of your creativity, you’ve learned to craft unique abstract art. Your brushstrokes now dance with purpose, guided by your intuition. You’ve discovered that abstract art is a journey, not a destination. With each piece, your style evolves, reflecting your inner world. You’ve taken the first steps, now keep creating, experimenting, and pushing your boundaries. Your art will continue to grow, a testament to your imagination and skill.

FAQ

Q: What is abstract art and how do I get started with creating it?

A: Abstract art is a form of art that does not depict recognizable subjects, but instead uses colors, shapes, and textures to create a unique visual language. To get started with creating abstract art, begin by experimenting with different materials and techniques, such as painting, drawing, or mixed media. Play with colors, textures, and patterns to develop your own style and express yourself creatively. You can also draw inspiration from other abstract artists, nature, or emotions to spark your creativity.

Q: What materials do I need to create abstract art?

A: The materials you need to create abstract art can vary depending on the technique and style you want to achieve. Some common materials used in abstract art include paints (acrylic, oil, or watercolor), canvases or papers, brushes, palette knives, and other tools for applying and manipulating the paint. You can also experiment with mixed media, incorporating materials like paper, fabric, or found objects into your artwork. Additionally, you may want to have a variety of surfaces, such as wood panels or boards, to create unique textures and effects.

Q: How do I develop my own unique style in abstract art?

A: Developing your own unique style in abstract art takes time and practice. Start by experimenting with different techniques, colors, and materials to see what works best for you. Look at the work of other abstract artists, but don’t try to copy their style – instead, use their work as inspiration to develop your own voice. Keep creating and pushing yourself to try new things, and you will eventually start to see a unique style emerge. It’s also important to trust your instincts and not overthink your process – abstract art is all about expression and intuition.

Q: Can I create abstract art without any formal training or experience?

A: Absolutely! Abstract art is all about experimentation and creativity, and you don’t need any formal training or experience to get started. In fact, many abstract artists are self-taught and have developed their skills through trial and error. The most important thing is to have a willingness to experiment and take risks – don’t be afraid to try new things and make mistakes. You can also find plenty of tutorials, workshops, and online courses that can provide guidance and inspiration as you develop your skills.

Q: How do I know when my abstract art piece is complete?

A: Knowing when an abstract art piece is complete can be subjective, as it’s often a matter of personal intuition. One way to determine if your piece is complete is to take a step back and look at it with fresh eyes – if it feels balanced and resolved to you, then it’s likely complete. You can also ask yourself if you’ve achieved the emotional or expressive effect you were aiming for. Another approach is to set a deadline or a specific goal for your piece, and when you’ve reached that goal, consider it complete. Ultimately, trust your instincts and don’t overwork your piece – sometimes, less is more in abstract art.

Linearyazilim Skip to content